| |
Introduction
The Cuddy Farms Field Office will notify our customer with the expected time that their poults will arrive. The arrival time will depend on when and where the poults are hatched.
While some stress to the poults is inevitable, our aim is to minimize it as much as possible. That is why we take great care to handle the poults gently during unloading. |
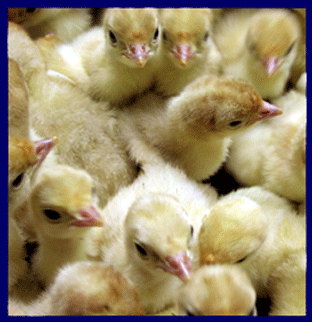
The poults have not had any feed or water since being pulled from the hatcher, as much as 24 hours earlier. It's necessary to have plenty of feed and fresh water available in the barn.
The poults should be bright and alert in the boxes. If they appear lethargic or if you see a lot of DOA’s, notify the Field Office. |
|
| |
Unloading Poults
Usually the day before the poults arrive on your farm, you will be told the flock size and the number of poults per parent flock. As much as possible, plan to put poults from only one parent flock into a brooder ring. Calculate the number of rings you will need for each group of poults. Ideally you should place no more than 250 toms in each ring. For hens this can be increased to 300 poults per ring.
Remember to keep one ring empty. This will be set up as a hospital pen once all the poults have been placed.
Take the poult boxes off of the truck and put them in the barn as quickly as possible. Place the boxes around the outside of the brooder rings according to your placement plan. If you have enough help, some people can start dumping the poults into the rings while the others continue unloading the truck. Otherwise, place all the boxes in the barn before you start to dump the poults.
Take a quick look around to make sure there aren’t any problems that require your immediate attention. If everything is okay, leave the barn for 30 to 60 minutes |
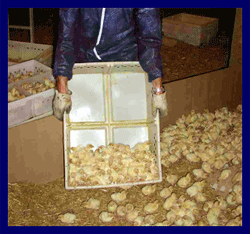
To begin dumping, remove the dividers from the box. Hold the box 6-8 inches off the ground. Tip the box up so that the poults gently spill out of the box onto the floor. Place the poults in such a way that they would be around the edge of the brooder stove if the stove was laying on the ground. Do not place the poults directly under the stove. Make sure any poults that were turned upside down during placement are turned right side up.
Once all of the poults have been placed inside a ring, you’ll want to give them a chance to settle down and find the feed and water. Staying in the barn during this period may distract the poults from eating and drinking. Take a quick look around to make sure there aren’t any problems that require your immediate attention. If everything is okay, leave the barn for 30 to 60 minutes |
|
| |
|
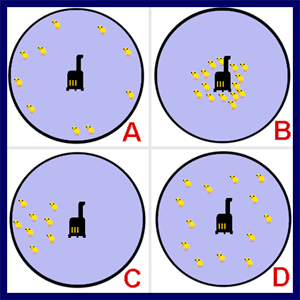
A - Too Hot
B - Too Cold
C - Too Draughty
D - Ideal Settings
|
|
Checking the Flock
Upon returning to the barn, check for any problems. The poults should be active, eating and drinking. Look for any poults that have flipped over onto their backs, have poor legs, appear weak or are dehydrated. Make sure the drinkers are working properly and the poults are able to get to the feed and water. Take note of where the poults have distributed themselves inside the ring. This will tell you if you need to raise or lower the brooder stove. [See Figure 1]
Cover the entire floor of the empty brooder ring with celsior pads from the poult boxes. This will be your cull pen. Place any poults that are having difficulty inside this ring until they are strong enough to return to the rest of the flock.
Place celsior pads under each brooder stove. Use 9 pads per stove in a 3 x 3 block. This will give the poults some better footing under stove and help prevent any flip-overs from getting stuck on their back and becoming dehydrated.
|
|