Introduction
Once your barn(s) is fully cleaned out and disinfected, you can start to set up for your next flock. You may not spread fresh litter in the barn(s) until:
-
the barn(s) is fully washed and disinfected
-
the area around the outside of the barn has been cleaned
-
you receive confirmation that the drag swabs from the barns are negative or you have disinfected the barns twice as instructed by the Field Office
-
you have sprayed insecticide along the walls and around the posts.
Ideally, you should have enough time between swab confirmation and receiving your poults to set up the barn(s) completely and do preventive maintenance on your equipment. Time spent in maintenance during the set up phase can reduce costly and frustrating break-downs when you are in production.
Sometimes scheduling is tight. In these cases, you will need to set priorities carefully. |
Equipment Maintenance
If possible, schedule outside contractors and internal maintenance staff, to do any required preventive maintenance before you disinfect. This reduces the outside traffic in your barns after disinfection. It is also generally easier to do maintenance before you spread litter.
Fumigation
If fumigation is required for your barns, service building and storage barn, [this depends on the health status of your previous flock] the Wash Crew will generally be assigned to do the work. After fumigation you must leave the doors closed for one or two days.
The Field Office will notify you if fumigation is necessary. |
Chlorinating Water Lines
During cleanout you will have flushed your water lines with a chlorine solution. Three days before your new flock arrives, you should repeat the flushing to be sure that the lines are disinfected before poult placement. Clean the lines between flocks as follows:
- Fill the lines with a disinfecting solution of 12% bleach. For tank systems add 2 gallons of bleach per 100 gallons of water in the tank. For proportioner systems, add 5 gallons of straight bleach to the proportioner and fill the lines running at the ratio of 1 oz./gallon.
- Air temperature above 0ºC: Leave the bleach solution in the lines for 24 hours. Flush the lines with plain water. Dump the drinkers several times to make sure that there is no chlorine residue in the drinking water. Drain and flush all dead ends of water lines, including drop lines. [High chlorine concentration in the drinking water will burn the mucosa of the poults’ beaks leading to starvation and death.]
- Air temperature below 0ºC: Contact the Field Office for instructions.
Note: When you have completed chlorinating the water lines, it is important that you send a water sample into the lab to be tested. It takes 24 hours to get the test results. You should get the water sample in early enough so that you have time to chlorinate your lines again if the test results show your water is contaminated. |
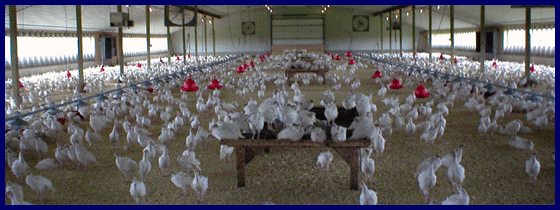
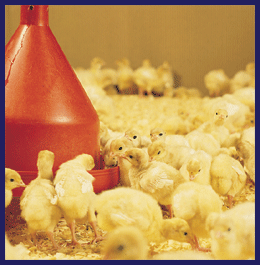
Getting the Barn Ready
It is very important that you ensure that the barn is set up properly. The poults you will receive will have just gone through the stressful process of hatching, servicing and being transported to your farm. If they are to thrive and become successful breeder candidates their basic needs of fresh air, clean water, proper feed, good litter and heat must be met. Your goal is to provide an environment that will satisfy all of these needs with as little stress as possible. |
-
Cover the entire floor with 3 to 4 inches (7.5-10 cm.) of clean soft wood shavings. The shavings must be free of dust and moulds to prevent respiratory problems.
-
Make brooder guard circles around each brooder stove using new 18” (45 cm.) high corrugated cardboard. Each circle should be 12-14 feet (3.65-4.25m.) in diameter with the stove hanging above the centre of the circle.
-
Rake and tamp the shavings inside the circle to a smooth surface.
-
Adjust the height of the stoves so that the temperature under the stove at poult level is 90-100° F (35-37°C). The temperature of the room should be 80-85°F (26-28°C). A goo
d starting point for hot rocks is 36-38 inches (91.5-96.5 cm) above the shavings. Start infra red stoves at 42-48 in. (106.5-122 cm.).
-
Use a max-min thermometer to record daily fluctuations.
|
-
Place 3 plasson type drinkers and 3 mini drinkers or water bottles inside each circle. The drinkers should be spaced evenly around the circle approximately 18 inches (45 cm) from the brooder guard.
-
When all the drinkers have been placed in the barn, turn the water on to check for leaks. Repair any leaks as necessary. When you are satisfied that all the drinkers are in working order, turn off the water and empty the drinkers by throwing the water onto the shavings. This will help add some moisture to the barn.
-
Place trough feeders between each drinker. Six per circle. These should be supplemented with 3 or 4 egg flats placed at various spots inside the circle. The goal is to place the feeders so that the poults can eat at whatever temperature they feel most comfortable.
-
Make arrangements to have feed delivered before the poults are scheduled to arrive.
|
The Day Before the Poults Arrive
The final preparations for receiving poults are done shortly before the poults arrive. The stoves must be turned on to bring the barn up to temperature. In the winter time, this will take about 24 hours. In the summer, turn the stoves on in the afternoon before the poults arrive.
The feed troughs and egg flats can be filled 12 to 24 hours prior to the poults arrival.
The drinkers should be washed and disinfected the day before arrival. Dump the drinkers just before the poults arrive to be sure that the water is fresh. |
|